CursusDB Documentation
Getting Started
CursusDB was designed to be setup securely within a couple minutes. Let's go through a couple thing's before you indulge.
There are no databases like MySQL let's say where you can have multiples. A cluster is your database that has many collections and that spreads data across many nodes.
So what do you need to run the most basic CursusDB database? A cluster and 1 node. A cluster in these parts is called Cursus whilst the node is called Curode. They are happy to meet you.
When you download the binaries and run them succesfully for the first time you will get a .cursusconfig and a .curodeconfig which are your cluster and node configurations. They are in yaml format and don't contain anything critical in plain sight. User details and key's are hashed and encoded within config files.
Configuration files
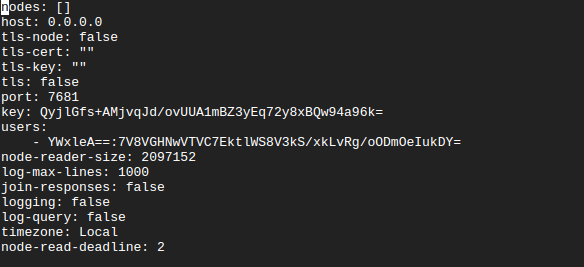
Cluster config .cursusconfig
- nodesdatabase cluster nodes. i.e an ip/fqdn + port combination (host: cluster1.example.com port: 7682)
- tls-nodewhether the cluster will connect to all nodes via tls
- tls-certpath to your tls cert for cluster
- tls-keypath to your tls key for cluster
- tlsenable or disable tls for cluster listener
- portcluster port
- keyencoded shared key. (Key is hashed)
- usersarray of database users serialized, encrypted and encoded.
- node-reader-sizethe max size of a response from a node in bytes
- join-responsesjoin all node responses and limit based on provided n
- loggingstart logging to file
- timezonedefault is Local but format allowed is for example America/Toronto
- log-querylogs client ip and their query to logs and or std out if enabled
- node-read-deadlineamount of time in seconds to wait for a node to respond
Cluster node config .curodeconfig
- replicasnode read replicas
- tls-certpath to your tls cert for cluster node
- tls-keypath to your tls key for cluster node
- tlsenable or disable tls for cluster node
- portnode port
- keyencoded shared key (Key is hashed)
- max-memorymax allowed memory for node, default is 10gb and in bytes
- loggingstart logging to file
- timezonedefault is Local but format allowed is for example America/Toronto
- replication-sync-timehow often to sync to read replica; default is 10 minutes
- replication-sync-timeouthow long to give a node to node replica connection before timing out. Default is 10 minutes. Increase accordingly as your nodes grow in size.
- tls-replicationconnect to all read replicas via tls
- automatic-backupsif enabled node will start backing up to backups folder within executing location
- automatic-backup-timehow often to backup default is 60 minutes
- automatic-backup-cleanupautomatic backup clean up ever 12 hours by default if enabled
- automatic-backup-cleanup-hourshow often to clean backups directory of old backups. will remove everything older than specified hours
- observersif configured your node will try to relay successful insert, update, and delete responses to your configured Observers
- tls-observersif configured your node will connect to your Observers via TLS instead of TCP
- backups-directorywhere your node backups are stored if
automatic-backupsis enabled
Couple things
There are no different configuration files for a replica. A node is a node and can be configured to be a replica or a main.
If you set
tls-nodeon the cluster to true the cluster will expect all nodes to be listening on tls.If you set
tls-replicationon a cluster node to true the cluster node will expect all node replicas to be listening on tls.When inserting a document to a non-existent collection, the collection will be created on the node.
A collection is like a labeled cabinet where your documents are stored.
A cluster will reconnect automatically to any unavailable node.
A node will reconnect automatically to any unavailable observer (if configured).
Now that you understand a bit of the configuration let's download the binaries and setup a database.
Remember default cluster port is 7681 and default cluster node port is 7682 but can be configured on execution dynamically overriding what's configured with the --port flag. Better know this ahead of time to set your firewall if need be. Whitelist ingress connections to TCP port 7681 and 7682 if setting up cluster and nodes remotely.
Downloading
You can download the CursusDB cluster and node stable binaries from Here
Debian based system amd64 example
Cursus - CursusDB Cluster
wget https://downloads.cursusdb.com/cursus/v/linux/amd64/cursus-v-amd64.tar.gz
tar -xzvf cursus-v-amd64.tar.gz
Curode - CursusDB Cluster Node
wget https://downloads.cursusdb.com/curode/v/linux/amd64/curode-v-amd64.tar.gz
tar -xzvf curode-v-amd64.tar.gz
Curush - CursusDB Cluster Shell
wget https://downloads.cursusdb.com/curush/v/linux/amd64/curush-v-amd64.tar.gz
tar -xzvf curush-v-amd64.tar.gz
Whats shown above are latest stable versions of all software!
On windows download the .exe's and run them through Powershell or CMD.
Setting Up Cluster
First download the latest version of the CursusDB cluster from Here for your operating system if you haven't already.
Once downloaded Cursus will expect an initial database user and shared cluster and node key to be created upon first start up.
./cursus
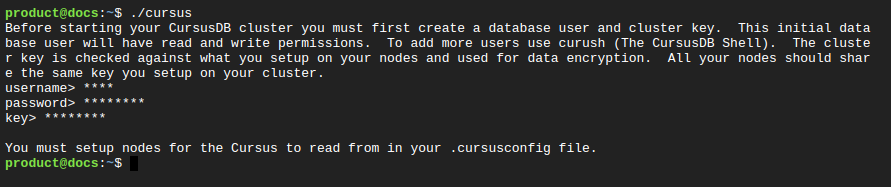
Now you'll have a .cursusconfig yaml file.

Your initial user has RW which is READWRITE permissions. You can see in your .cursusconfig that you have a hashed and encoded user which is done to be stored securely and take up little room.
Your cluster will start without TLS enabled by default. You can enable TLS within .cursusconfig
The tls-cert and tls-key values can be populated with the location of your tls key and cert. You must also make sure to set tls to true
As the cluster states you must setup at least one node to use the database system.
To do that let's have a look below:
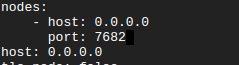
Say I want to start a node locally.
nodes:
    - host: 0.0.0.0
      port: 7682
      replicas: # if you want the node to have read replicas
        - host: 0.0.0.0 # only if you want the node to have read replicas
          port: 7683 # only if you want the node to have read replicas
tls-cert: ""
tls-key: ""
tls: false
port: 7681
users:
    - DX8EAQL/gAABDAEQAABO/4AAAwh1c2VybmFtZQZzdHJpbmcMBgAEYWxleAhwYXNzd29yZAZzdHJpbmcMCAAGcGFkdWxhCnBlcm1pc3Npb24Gc3RyaW5nDAQAAlJX
You might be thinking ok, but what about the node I don't have it yet.
Not to worry. You can download the curode which is the Cursus cluster node from Here if you haven't already.
If you tried to run the cluster when any node is unavailable you will get the below result:

Running Node
To run your CursusDB node you simply run the command below
./curode
OR
./curode -port=YOURPORT

A node can be configured in many ways so it's good to understand the config as stated previously in the getting started portion.
This example is the most basic setup!
Once your node is running, now you can start your cluster.
./cursus
OR
./cursus -port=YOURPORT

Fantastic! Now it's time to learn some CDQL(Cursus Document Query Language) ✍️✍️
Connecting To Cluster
Connect via curush (CursusDB Shell Program)
Connect via native client package:
Node.js
https://www.npmjs.com/package/cursusdb-node
Python
https://github.com/cursusdb/cursusdb-py
Java
https://github.com/cursusdb/cursusdb-java
GO
https://github.com/cursusdb/cursusdb-go
C#
https://github.com/cursusdb/cursusdb-cs
Query Language
CDQL - Cursus Document Query Language
CursusDB's Query Language is very similar to that of SQL.
Pointers
- End every query with a semi colon.
- Nested objects are not part of CursusDB's search algorithms.
- Keep it lowercase this is not SQL.
Operators
>>=<>====!=
Conditional symbols
&&is AND||is OR
Actions
selectupdatedelete
Ping the cluster
ping;
Inserting Documents
Inserting documents is very easy. CursusDB takes JSON within the insert's parenthesis like so:
insert into users({"name": "Alex", "last": "Lee", "age": 28});
The query above inserts the document into a users collection. Documents within a collection on CursusDB are unstructured/schemaless meaning I could insert the next document like so:
insert into users({"name": "Jane", "last": "Lee", "age": 28, "sex": "F"});
CQDL expects simple JSON documents so no nested objects.
In the example below you can see a good example of an array within a document. This array is searchable as you will see soon.
insert into users({"name": "John", "last": "Josh", "age": 28, "tags": ["tag1", "tag2"]});
What about uniqueness across all nodes?
CursusDB has this covered. When inserting a document you can use an exclamation mark after your key name like so:
insert into users({"name!": "John", "last": "Josh", "age": 28, "tags": ["tag1", "tag2"]});
Now on insert CursusDB will check every node or node replica before inserting if there is a document within the users collection with a key of "name" and value of "John". If there is you will get back a status code 4004 regarding a duplicate document.
Say we want all values within the tags array to be unique you just write "tags!"
insert into users({"name!": "John", "last": "Josh", "age": 28, "tags!": ["tag1", "tag2"]});
The exclamation mark should be at the end of your keys.
"key!"
Selecting Documents
Selecting and deleting documents share the same logic. What goes for select goes for delete in regards to CDQL. The update action is a bit different.
When you search for a string literal you can use single or double quotes
ACTION LIMIT-SKIP CONDITIONALS
select * from collection; // * is all
select * from collection where k = v && k != 'v' || k >= v && k = true && k = "v";
select * from users; // select all from users
select 0,2 from users; // select 2 from users skipping 0
select 2,3 from users; // select 3 from users skipping 2
select 4,5 from users; // select 5 from users skipping 4
select 5,* from users; // select all skipping 5

select 1 from users where name = 'Alex' || name = 'John'; // select 1 from users where name is Alex or name is John
In CDQL you can search in an array very easily. Remember that one insert we did?
insert into users({"name!": "John", "last": "Josh", "age": 28, "tags": ["tag1", "tag2"]});
Let's select all from users that have "tag1" in their tags array.
select * from users where tags = 'tag1';
Deleting Documents
Deleting is exactly like select but with delete as the action
delete 1 from collection where k = v && k != v || k >= v && k = true;
delete * from users where age >= 28 || age < 32;
delete 10,* from users where age > 28 && name == 'Alex';
ect
Updating Documents
Updating is similar to select and delete, but instead of "from collection" we write "in collection" and we add update set's as shown below.
update 1 in users where age >= 28 set name = 'Josie';
update * in users where age > 24 && name == 'Alex' set name = 'Josie';
You can have multiple sets!
update * in users where age > 24 && name == 'Alex' set name = 'Josie' set age = 52;
Counting
Response not joined
select count from users where $id == "099ade86-93a8-4703-abdd-d1ccc1078b1d";
[{"127.0.0.1:7682": [{"count":1}]}]
Response joined if each node has 1 match and there is 5 nodes
{"count":1}
Response joined if each node has 1 match across all nodes and there are 5 nodes
select count from users where firstName = "Alex";
{"count":5}
Pattern Matching
LIKE
Starts with 'A'
select * from users where firstName like 'A%lex Padula';
Ends with 'la'
select * from users where firstName like 'Alex Padu%la';
Contains 'Pad'
select * from users where firstName like 'Alex %Pad%ula';
NOT LIKE
Starts with 'A'
select * from users where firstName not like 'A%lex Padula';
Ends with 'la'
select * from users where firstName not like 'Alex Padu%la';
Contains 'Pad'
select * from users where firstName not like 'Alex %Pad%ula';
Sorting
CursusDB nodes are smart enough to determine a letter or number. Sorting in desc or asc will either sort alphabetically or sort the provided based on value(string, float, or int)
select * from posts order by createdOn desc;
select * from posts order by createdOn asc;

select * from users order by firstName desc;
select * from users order by firstName asc;
Adding Database Users
CursusDB has 2 permissions R(read) and (RW). RW can select, insert, delete, update and add new users whereas users with just R can only read.
new user YOURUSERNAME, YOURPASSWORD, RW;
Using a client like curush the CursusDB Shell Program.
curush> new user someusername, somepassword, RW;
Removing Database Users
RW permission is required and the username of the user you'd like to remove from accessing your CursusDB cluster.
delete user USERNAME;
Listing database users
RW permission is required and the username of the user you'd like to remove from accessing your CursusDB cluster.
users;
["alex","daniel"]
Listing collections
curush>collections;
[{"127.0.0.1:7682": {"collections":["losers","winners","users"]}}]
Deleting a key within documents in a collection
It's very simple to alter a collections documents. Say you want to remove the y key from a documents like below:
[{"$id":"fcb773f6-2d77-45fe-a860-9dd94f5e7c07","x":5,"y":7},{"$id":"a567925e-dbb1-405e-b4ac-12522b33d07e","x":2,"y":4},{"$id":"4fa938f6-6813-4db9-9955-f5e3c81a9c0b","x":55,"y":9}]}]
Simple using a native client:
curush>delete key y in example;
[{"127.0.0.1:7682": {"message":"Document key removed from collection successfully.","statusCode":4021,"altered":3}}]
Deleting collections
When you remove every document from a collection the collection is removed i.e
delete * from losers;
..."1 Document(s) deleted successfully.","statusCode":2000}}]
curush>collections;
[{"127.0.0.1:7682": {"collections":["winners","users"]}}]
Automatic Node Read Replicating/Synchronization
When you configure a node you can configure a replica. This configuration requires you to modify both cluster and node configuration files.
.cursusconfig
nodes:
- host: 0.0.0.0
  port: 7682
  replicas:
  - host: 0.0.0.0
    port: 7683
....
.curodeconfig
replicas:
  - host: 0.0.0.0
    port: 7683
tls-cert: ""
tls-key: ""
....
With those configurations set your node will start to sync data every default time of 10 minutes(replication-sync-time). The cluster will as well on read failure of main node will retry to up to any amount of set node read replicas.
Automatic Node Backups
A node can be configured to generate backups with config automatic-backups set to true. A backup by default is generated automatically every 60 minutes(automatic-backup-time) into a backup directory which is created on first run.
Automatic Node Backup Cleanup
A node can be configured to remove all old backups with config automatic-backup-cleanup set to true. The default is every hour to delete all backups older than an hour. This can be configured with automatic-backup-cleanup-hours in minutes.
Logging
Logs for the CursusDB cluster and node are found where you launch your binaries. Cluster: cursus.log Node: curode.log if logging is enabled.
You can enable logging on either cluster or node enabling logging. This will log to file instead of stdout.
logging: true
Within your yaml configs you can set log-max-lines this option will tell either node or cluster when to truncate(clear up) the log file(s).
How are logs are formatted?
[LEVEL][YOUR CONFIGURED TZ RFC822 DATE] DATA
Logs can have either level:
- ERROR
- FATAL
- INFO
- WARN
TLS with Certbot (Debian based system example)
If you have any Certbot packages installed using an OS package manager like apt, ect, you should remove them before installing the Certbot snap. This ensures that when you run the command certbot the snap is used rather than the installation from your OS package manager.
sudo apt-get remove certbot
OR
sudo dnf remove certbot
OR
sudo yum remove certbot
Then install certbox
sudo snap install --classic certbot
Run the following in your command line to ensure that the certbot command can be run.
sudo ln -s /snap/bin/certbot /usr/bin/certbot
Note: Certbot requires ports 80 and 443
Setup cert for FQDN example cluster-0.example.com
sudo certbot certonly --standalone -d cluster-0.example.com
Saving debug log to /var/log/letsencrypt/letsencrypt.log
Requesting a certificate for cluster-0.example.com

Successfully received certificate.
Certificate is saved at: /etc/letsencrypt/live/cluster-0.example.com/fullchain.pem
Key is saved at:         /etc/letsencrypt/live/cluster-0.example.com/privkey.pem
This certificate expires on 2024-02-24.
These files will be updated when the certificate renews.
Certbot has set up a scheduled task to automatically renew this certificate in the background.

- - - - - - - - - - - - - - - - - - - - - - - - - - - - - - - - - - - - - - - -
If you like Certbot, please consider supporting our work by:
* Donating to ISRG / Let's Encrypt:   https://letsencrypt.org/donate
* Donating to EFF:                    https://eff.org/donate-le
- - - - - - - - - - - - - - - - - - - - - - - - - - - - - - - - - - - - - - - -
Now with your cert and key ready you can setup your .cursusconfig and or .curodeconfig
nodes:
    - host: 0.0.0.0
      port: 7682
tls-cert: "/etc/letsencrypt/live/cluster-0.example.com/fullchain.pem"
tls-key: "/etc/letsencrypt/live/cluster-0.example.com/privkey.pem"
tls: true
port: 7681
users:
    - DX8EAQL/gAABDAEQAABO/4AAAwh1c2VybmFtZQZzdHJpbmcMBgAEYWxleAhwYXNzd29yZAZzdHJpbmcMCAAGcGFkdWxhCnBlcm1pc3Npb24Gc3RyaW5nDAQAAlJX
Now when your cluster is secured with TLS every attempt to connect with Curush or a native package you must make sure to enable TLS.
./curush --host=X --port=X --tls=true
Reserved Document Keys
These are a list of keys that cannot be used in your document structure i.e {"not like": "bad"}.
count$id$indxinnot like!likewherechanconstcontinuedeferelsefallthroughfuncgogotoifinterfacemapselectstructswitchvarfalsetrueuint8uint16uint32uint64int8int16int32int64float32float64complex64complex128byteruneuintintuintptrstring==&&||><=*
Status Codes
A CursusDB status code is a numerical value assigned to a specific message. The numerical values are used as a shorthand to the actual message. They are grouped by
Othersignals, shutdownsAuthentication / Authorizationcluster and node authDocument & CDQLdocument and query language
Other
-1Received signal (with signal) -1 is just for the system it doesn't mean error in CursusDB's case.
Authentication / Authorization
0Authentication successful1Unable to read authentication header2Invalid authentication value3No user exists4User not authorized5Failed node sync auth
Node / Cluster
100Node is at peak allocation101Invalid permission102User does not exist103Database user already exists104No node was available for insert105Node unavailable106Node ready for sync107Node replica synced successfully108Could not decode serialized sync data into hashmap109No previous data to read. Creating new .cdat file110Could not open log file to write to (with description)111Data file corrupt (with description)112Collection mutexes created113Could not unmarshal system yaml configuration (with description)114Could not marshal system yaml configuration (with description)115Could not decode configured shared key (with description)116Reconnected to lost connection (includes host:port)117Reconnected to lost observer connection (includes host:port)118Could not open/create configuration file (with description)119Could not open/create data file (with description)120No .qqueue file found. Possibly first run, if so the node will create the .qqueue file after run of this method (after first run you will normally see a ..505 0 recovered and processed from .qqueue.0 being what was left on the query queue)200New database user created successfully201Database user removed successfully202Could not decode user username203Could not marshal users list array204There must always be one database user available205Could not marshal user for creation206Could not get node working directory for automatic backup (with description)207Could not create automatic backups directory (with description)208Could not read node backups directory (with description)209Could not remove .cdat backup FILE NAME (with description)210Could not get node working directory for automatic recovery (with description)211Node recovery from backup was successful213Delete key missing in214Node was unrecoverable after all attempts215Attempting automatic recovery with latest backup216Starting to sync to with master node217Synced up with master node (with addr)218Observer HOST:PORT was unavailable during relay219Could not encode data for sync (with description)220Starting to write node data to file221Starting to write node data to backup file222Node data written to file successfully223Node data written to backup file successfully224Observer connection established (with info)225Node connection established (with info)500Unknown error (with description)502Node could not recover query queue503Could not dial self to requeue queries (with description)504Could not commit to queued query/transaction505n recovered and processed from .qqueue507Error loading X509 key pair (with description)
Document & CDQL
2000Document inserted/updated/deleted4000Unmarsharable JSON insert4001Missing action4002None existent action4003Nested JSON objects not permitted4004Document already exists4005Invalid command/query4006From is required4007Invalid query operator4008Set is missing =4009Invalid insert query missing 'insert into'4010Invalid insert query is missing parentheses4011Invalid update query missing set4012Could not marshal JSON4013Unparsable boolean value4014Unparsable float value4015Unparsable integer value4016Missing limit value4017Invalid query4018Unmarsharable JSON4019Update sets are missing4020In is required4021Document key removed from collection successfully4022No documents found to alter4023No unique $id could be found for insert4024Batch insertion is not supported4025Where is missing values4026Delete key missing in4027Limit skip must be an integer (with description)4028Could not convert limit value to integer (with description)4029Invalid limiting value (with description)4030Key cannot use reserved word4031Key cannot use reserved symbol4032Invalid set array values (with description)
Realtime Observers
With CursusDB you can setup a Node Observer which is a TCP listener that authenticates with your nodes with your shared key. Your nodes if configured with the correct observers will relay all successful (insert,update,delete) responses as messages to your Observers and the Observer emit them as events. These events can be relayed to websockets/webtransports and so forth.
To use observer(s) with your nodes make sure you configure them!
.curodeconfig
...
observers:
    - host: 0.0.0.0
      port: 7680
tls-observers: false
The default port for an Observer is 7680 but can be configured.
CursusDB Observer Packages, Modules, Libraries
- Node.JS https://www.npmjs.com/package/cursusdb-observer-node
- GO (COMING SOON)
- Python (COMING SOON)
- Java (COMING SOON)
- C# (COMING SOON)
Here is an example of how you can use an Observer and Websockets for realtime node(s) relay on inserts, updates, and deletes!
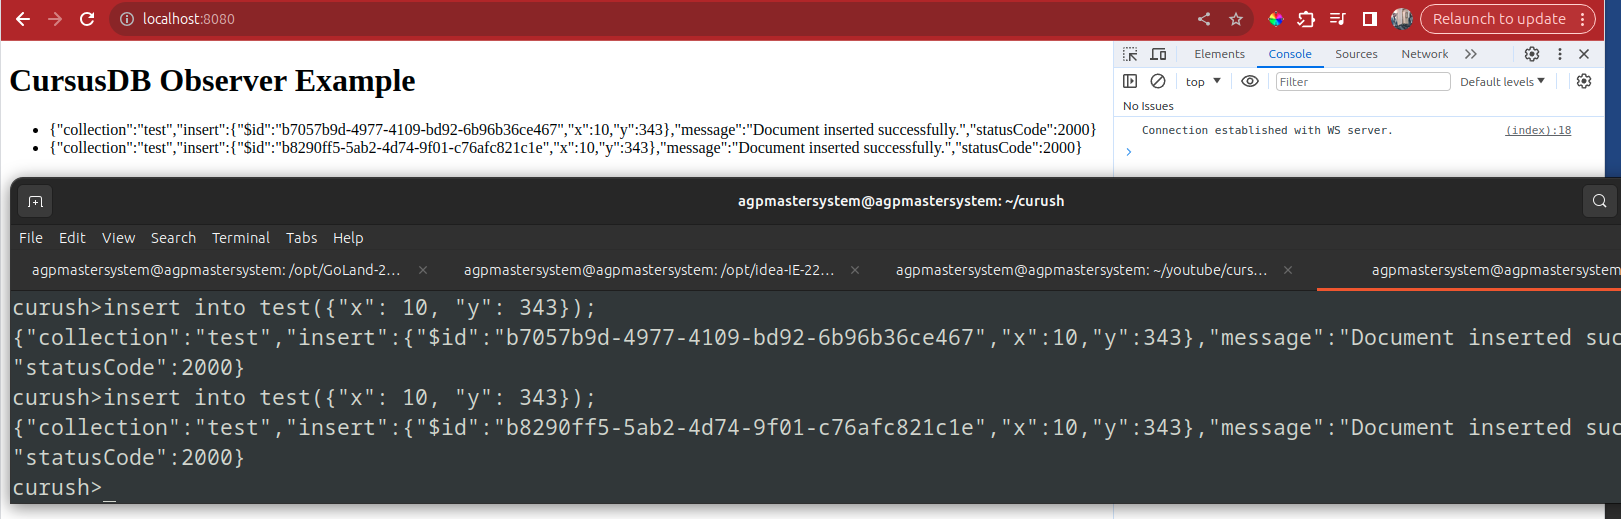
https://github.com/cursusdb/cursusdb-observer-node-ws-example